Abstract: Embedded systems which require user interaction must interface with devices that accept user input (such as a keypad, bar code reader or smart card acceptor) as well as devices that display information to the user (such as LED or LCD displays). This application note, using the MAXQ2000 microcontroller, covers the use of two such typical devices - a 4x4 switch keypad and an LCD display.
Overview
Embedded systems which require user interaction must interface with devices that accept user input (such as a keypad, bar code reader, or smart card acceptor), as well as devices that display information to the user (such as LED or LCD displays). This application note covers the use of two such typical devices, a 4 x 4 switch keypad and an LCD display, with the MAXQ2000 microcontroller.
All example code for this application note was written in MAXQ assembly language, using the MAX-IDE development environment. The code was targeted for the MAXQ2000 Evaluation Kit (EV kit) board, using the following additional hardware.
- LCD—Varitronix static 3-volt LCD display, part number VI-502 (included with the MAXQ2000 EV Kit)
- Keypad—Grayhill 16-button (4 rows by 4 columns) keypad, part number 96BB2-006-F
Design Goals
Our example application will demonstrate basic use of both the keypad and LCD display by accepting input from the keypad and displaying the characters entered on the LCD. The application will handle switch debouncing correctly to avoid registering multiple characters from a single keypress, and it will also allow characters to be deleted once input. As a final task, contrast adjustment of the LCD display will be supported by the keypad.
As with any embedded design, the application should attempt to utilize the resources of the MAXQ2000 efficiently.
- Interrupt routines should use as little stack space as possible.
- Working register usage should be kept to a minimum.
Interfacing to the 4x4 Keypad
The keypad used for this example application consists of 16 switches, organized in a 4 x 4 grid. (Figure 1.)
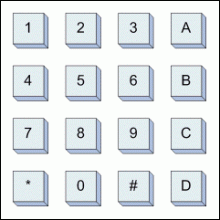
Figure 1. Keypad switch layout.
The switches are tied together in a row and column matrix as shown below in Figure 2. Depressing a keypad switch connects one row line to one column line. For example, depressing the "3" key connects row 1 and column 3 together.
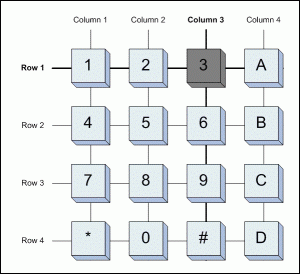
Figure 2. Keypad row/column matrix.
The keypad provides eight interface pins, one pin for each row and column of the keypad matrix. To allow use of a single, eight-connector cable to run from the keypad to the MAXQ2000 EV Kit, we will connect the keypad to port pins P6[5:0] and P7[1:0] through the JU2 header pin connector on the evaluation kit board, as shown below in Table 1. For a custom design, the keypad could be connected to the microcontroller in the most efficient method possible.
Table 1. Port Pin Connections to Keypad Row and Column Lines
| Pin |
1 |
2 |
3 |
4 |
5 |
6 |
7 |
8 |
| Connect |
Row 1 |
Row 2 |
Row 3 |
Row 4 |
Col 1 |
Col 2 |
Col 3 |
Col 4 |
| Port Pin |
P6.0 |
P6.1 |
P6.2 |
P6.3 |
P6.4 |
P6.5 |
P7.0 |
P7.1 |
| JU2 Pin |
54 |
52 |
50 |
48 |
46 |
44 |
42 |
40 |
When connecting the keypad to the EV kit board for this example, the board should be configured as follows:
- These DIP switches must be OFF—All SW1 switches, SW3.1, SW3.7, SW3.8, SW6.1, SW6.4, SW6.5, SW6.6, SW6.7, and SW6.8.
- OPEN jumpers JU5, JU6, JU8, and JU9.
Optionally, when running the example application without modification, all the DIP switches may be turned off to simplify setup; only jumpers JU1, JU2, JU3 and JU11 need to be connected.
Scanning by Columns
With the row and column arrangement of the keypad, it is possible to read the state of four of the switches at any one time. This can be done on either a per row or per column basis.
To read four switches in one column, the line for that column must be pulled low, and all other columns tristated. Next, a weak pull-up must be established on each row line. Finally, connect the four row lines to port pin inputs. Defaulting to a HIGH state, the row input transitions low when the switch for that row is depressed. (Figure 3.)
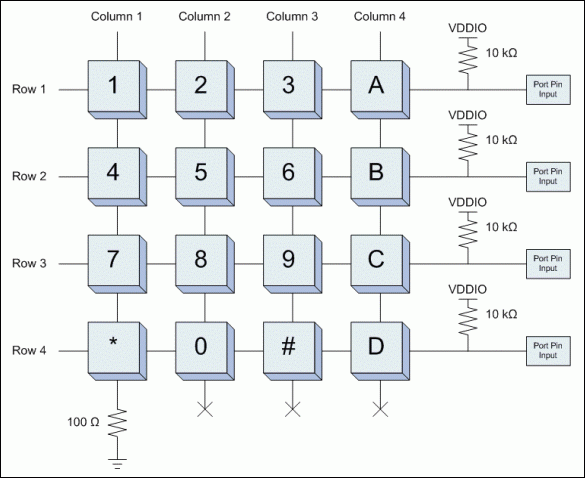
Figure 3. Keypad setup to read column 1 switches.
Similarly, the state of four switches in a row may be read by pulling that row line low and setting inputs and weak pullups on all four columns. The rows and columns are interchangeable.
In our setup (Table 2), the four row lines (keypad pins 1 through 4) are all connected to the same input port (P6[3:0]), which makes it easier to read them all at once. For this reason, the example application will scan the keypad by columns, not by rows.
There are four setup states for the eight port-pin lines connected to the keypad, each of which allows four of the switches to be read. All input lines read LOW when the switch being read is closed, and HIGH when the switch is open.
Table 2. Port Pin Settings for Keypad Column Read States
| State |
P6.0 |
P6.1 |
P6.2 |
P6.3 |
P6.4 |
P6.5 |
P7.0 |
P7.1 |
| 1 |
Input - 1 |
Input - 4 |
Input - 7 |
Input - * |
LOW |
Tristate |
Tristate |
Tristate |
| 2 |
Input - 2 |
Input - 5 |
Input - 8 |
Input - 0 |
Tristate |
LOW |
Tristate |
Tristate |
| 3 |
Input - 3 |
Input - 6 |
Input - 9 |
Input - # |
Tristate |
Tristate |
LOW |
Tristate |
| 4 |
Input - A |
Input - B |
Input - C |
Input - D |
Tristate |
Tristate |
Tristate |
LOW |
An Interrupt-Driven State Machine
To ensure that a keypress is not missed, the four columns must be strobed quickly. Additionally, to prevent the bouncing contacts of a switch from registering multiple presses, the application requires that a key be held down for a certain amount of time before it registers. Both of these problems can be solved at once, by making a timer-driven interrupt routine the heart of the application.
RELOAD           equ 0FF00h

StartTimer:
   move    IIR.3, #1         ; Enable interrupts for module 3
   move    IMR.3, #1

   move    T2V0, #RELOAD
   move    T2R0, #0h
   move    T2C0, #0h

   move    Acc, T2CFG0       ; Set timer 0 to run from HFClk/128
   and     #08Fh
   or      #070h
   move    T2CFG0, Acc

   move    T2CNA0.3, #1      ; Start timer 0
   move    T2CNA0.7, #1      ; Enable timer 0 interrupts
   ret
The reload value for the timer, which controls how often the interrupt will fire, should be short enough that all key presses are caught and that key response is not noticeably sluggish. The reload value also should be long enough that it does not occupy an excessive amount of processing time. The value 0FF00h shown above (once about every 2.4 ms) was arrived at through experimentation.
Once the column line for a group of four switches is driven LOW, a certain amount of time may be required for the connection through a depressed switch to pull its input line low. This time will be affected by the on-resistance of the switch and by how many switches on the column are depressed at once. To avoid having to delay in the interrupt service routine between pulling the column line low and reading the four switches, the column line for a given state will be driven LOW in the previous state, as shown in Figure 4.
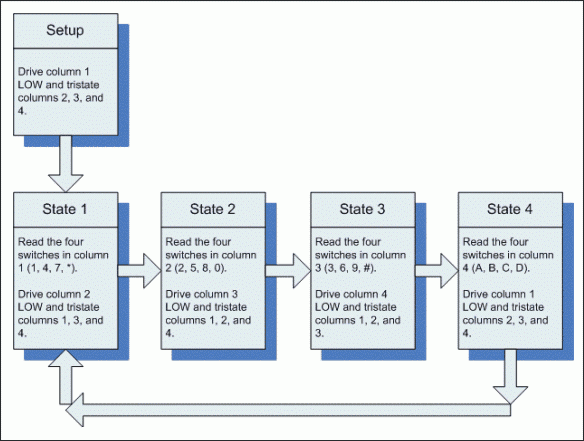
Figure 4. Keypad read-state machine.
Because the interrupt vector (IV) for the MAXQ2000 can be set on-the-fly, it is possible to hold the next-state value in the interrupt vector register by having the handler routine for each state set the vector address to the next state's handler routine.
org  0000h

Main:
   call    InitializeLCD

   move    PD6, #010h         ; For state 1
   move    PO6, #00Fh         ; For all states
   move    PD7, #000h         ; For state 1
   move    PO7, #000h         ; For all states

   move    IV, #State1
   call    StartTimer
   move    IC, #1            ; Enable global interrupts

   jump    $

State1:
   push    PSF
   push    Acc

   move    Acc, PI6
   and     #000Fh            ; Grab lowest four bits only
   sla4
   move    A[13], Acc

   move    PD6, #020h        ; For state 2
   move    PD7, #000h

   move    T2V0, #RELOAD     ; Set reload value
   move    T2CNB0.1, #0      ; Clear interrupt flags
   move    T2CNB0.3, #0
   move    IV, #State2

   pop     Acc
   pop     PSF

   reti
The handler routines for the other four states are similar, with a slight adjustment to OR in the previously collected switch bits in the A[13] holding register. Three working accumulators are used by the state routines.
A[13] holds the bit array of all the switch states read on the current pass through the keypad. After the State 4 read has completed, this register will contain the following bits, where a 1 bit represents an open (released) key switch and a 0 bit represents a closed (depressed) key switch.
| bit 15 |
bit 14 |
bit 13 |
bit 12 |
bit 11 |
bit 10 |
bit 9 |
bit 8 |
bit 7 |
bit 6 |
bit 5 |
bit 4 |
bit 3 |
bit 2 |
bit 1 |
bit 0 |
| * |
7 |
4 |
1 |
2 |
5 |
8 |
0 |
3 |
6 |
9 |
# |
D |
C |
B |
A |
A[14] holds the bit array from the previous pass through the state machine. This is used by the debouncing code.
A[15] holds the last bit pattern which was held long enough to be registered as a key press. This is used to prevent key presses from repeating.
Debouncing Switches
After State 4 has been reached and all keys have been scanned, a decision must be made whether to accept any keys that are pressed.
A simple way to handle debouncing would be to maintain a counter value for each of the sixteen switches. Every time State 4 is reached and the key is pressed, the counter is incremented. If the key is not pressed, the counter is decremented. When the counter reaches a certain value, the keypress is registered. To prevent a held-down key from repeating (which typically is allowed on computer keyboards but not on keypads), the counter must be allowed to decrement back to zero (by releasing the key) before that key may be registered again.
Because we have the state of all 16 keys in a single register, there is a simpler, less memory-intensive solution. The application will maintain a single counter value (held in LC[0]) which will initially be set to a debounce constant. This counter is decremented each time the bit pattern matches the pattern read on the previous pass (in A[14]).
State4:
   push    PSF
   push    Acc

   move    Acc, PI6
   and     #000Fh            ; Grab low four bits only
   or      A[13]

   cmp     A[15]
   jump    E, State4_End     ; Ignore the last debounced pattern

   cmp     A[14]
   jump    E, State4_Match   ; Match against pattern from last keypad read

   move    LC[0], #DEBOUNCE
   move    A[14], Acc        ; Reset current bit array
To prevent keys from repeating, once a bit pattern has been static long enough to be accepted, a different bit pattern (which includes the idle state where no keys are depressed) must be accepted before the first bit pattern can be accepted again.
Handling Simultaneous Keypresses
It is possible for more than one key to be pressed at once. The debouncing code will ensure that if a second key is pressed right after the first, the debounce interval will start over, but the interval will be short enough in practice that this will not be an issue.
Once a bit pattern has been accepted, the action for each depressed-key bit may be taken by rotating all 16 bits into the carry bit, one at a time using the accumulator and checking each in turn. The code below responds only to the first depressed key, but this could be changed easily enough.
State4_Match:
   djnz    LC[0], State4_End
   move    A[15], Acc       ; Reset last debounced pattern

   rrc
   jump    NC, State4_KeyA
   rrc
   jump    NC, State4_KeyB
   rrc
   jump    NC, State4_KeyC
   rrc
   jump    NC, State4_KeyD

   rrc
   jump    NC, State4_Key3
   rrc
   jump    NC, State4_Key6
   rrc
   jump    NC, State4_Key9

   rrc
   jump    NC, State4_KeyPound
   rrc
   jump    NC, State4_Key2
   rrc
   jump    NC, State4_Key5
   rrc
   jump    NC, State4_Key8
   rrc
   jump    NC, State4_Key0

   rrc
   jump    NC, State4_Key1
   rrc
   jump    NC, State4_Key4
   rrc
   jump    NC, State4_Key7
   rrc
   jump    NC, State4_KeyStar

   jump    State4_End
Interfacing to the LCD Display
The LCD display included with the MAXQ2000 evaluation kit has segments defined as shown in Figure 5.
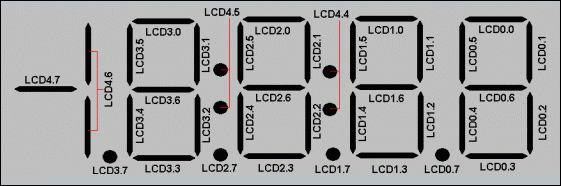
Figure 5. LCD segment memory mapping.
To use the LCD display, the LCD controller must first be initialized to static drive mode and enabled.
InitializeLCD:
   move    LCRA, #03E0h      ; xxx0001111100000
                             ;    00            - DUTY : Static
                             ;      0111        - FRM  : Frame freq
                             ;          1       - LCCS : HFClk / 128
                             ;           1      - LRIG : Ground VADJ
                             ;            00000 - LRA  : RADJ = max

   move    LCFG, #0F3h       ; 1111xx11
                             ; 1111     - PCF  : All segments enabled
                             ;       1  - OPM  : Normal operation
                             ;        1 - DPE  : Display enabled

   move    LCD0, #00h        ; Clear all segments
   move    LCD1, #00h
   move    LCD2, #00h
   move    LCD3, #00h
   move    LCD4, #00h
   ret
Once this has been done, characters may be written to the display by setting segments appropriately. The display is wired to the LCD segment lines of the MAXQ2000 so that the segments map into memory the same for each of the four 7-segment characters. As shown in the mapping diagram above (Figure 5), the characters are written (from right to left) by setting the LCD0, LCD1, LCD2 and LCD3 display memory registers.
;                    dGFEDCBA
LCD_CHAR_0       equ 00111111b
LCD_CHAR_1       equ 00000110b
LCD_CHAR_2       equ 01011011b
LCD_CHAR_3       equ 01001111b
LCD_CHAR_4       equ 01100110b
LCD_CHAR_5       equ 01101101b
LCD_CHAR_6       equ 01111101b
LCD_CHAR_7       equ 00000111b
LCD_CHAR_8       equ 01111111b
LCD_CHAR_9       equ 01101111b
LCD_CHAR_A       equ 01110111b
LCD_CHAR_B       equ 01111100b
LCD_CHAR_C       equ 00111001b
LCD_CHAR_D       equ 01011110b

State4_Key0:
   move    Acc, #LCD_CHAR_0
   jump    State4_Shift

State4_Key1:
   move    Acc, #LCD_CHAR_1
   jump    State4_Shift

State4_Key2:
   move    Acc, #LCD_CHAR_2
   jump    State4_Shift

State4_Key3:
   move    Acc, #LCD_CHAR_3
   jump    State4_Shift

State4_Key4:
   move    Acc, #LCD_CHAR_4
   jump    State4_Shift

State4_Key5:
   move    Acc, #LCD_CHAR_5
   jump    State4_Shift

State4_Key6:
   move    Acc, #LCD_CHAR_6
   jump    State4_Shift

State4_Key7:
   move    Acc, #LCD_CHAR_7
   jump    State4_Shift

State4_Key8:
   move    Acc, #LCD_CHAR_8
   jump    State4_Shift

State4_Key9:
   move    Acc, #LCD_CHAR_9
   jump    State4_Shift

State4_KeyA:
   move    Acc, #LCD_CHAR_A
   jump    State4_Shift

State4_KeyB:
   move    Acc, #LCD_CHAR_B
   jump    State4_Shift

State4_KeyC:
   move    Acc, #LCD_CHAR_C
   jump    State4_Shift

State4_KeyD:
   move    Acc, #LCD_CHAR_D
   jump    State4_Shift
Editing the PIN
When any of the alphanumeric keys are pressed, the corresponding character is loaded into the rightmost character on the LCD display. All existing characters are shifted one place left.
State4_KeyStar:
   move    LCD0, LCD1
   move    LCD1, LCD2
   move    LCD2, LCD3
   move    LCD3, #0
   jump    State4_End

State4_Shift:
   move    LCD3, LCD2
   move    LCD2, LCD1
   move    LCD1, LCD0
   move    LCD0, Acc

State4_End:
   move    PD6, #010h        ; Set up values for next state
   move    PD7, #000h

   move    T2V0, #RELOAD     ; Set reload value
   move    T2CNB0.1, #0      ; Clear interrupt flags
   move    T2CNB0.3, #0
   move    IV, #State1

   pop     Acc
   pop     PSF

   reti
The 'star' key is connected in this application to a delete/backspace function. Pressing the star key shifts all characters one place to the right and erases the leftmost character from the display.
Contrast Adjustment
The pound key performs one additional function for demonstration purposes. Pressing it adjusts the contrast of the LCD display, a simple function performed by incrementing the RADJ bits in the LCRA register.
State4_KeyPound:
   move    Acc, LCRA
   or      #0FFE0h           ; clear low five bits
   move    A[13], Acc        ; save version with bits cleared

   move    Acc, LCRA
   and     #0001Fh           ; get low five bits only
   add     #1                ; increment
   and     #0001Fh           ; mask out any carry to sixth bit
   or      A[13]             ; OR in the rest of the bits
   move    LCRA, Acc         ; change contrast

   jump    State4_End
Conclusion
The MAXQ2000 interfaces easily and directly to LCD displays by means of its dedicated LCD controller peripheral. Multiplexed key pads can be read in a straightforward manner using the flexible port pin configuration provided by the MAXQ2000. An interrupt-driven state machine allows all keys in the matrix to be scanned and debounced behind the scenes of the main application with minimal effect on processor overhead.


